2012年5月16日 星期三

NIC Bonding on RHEL 6

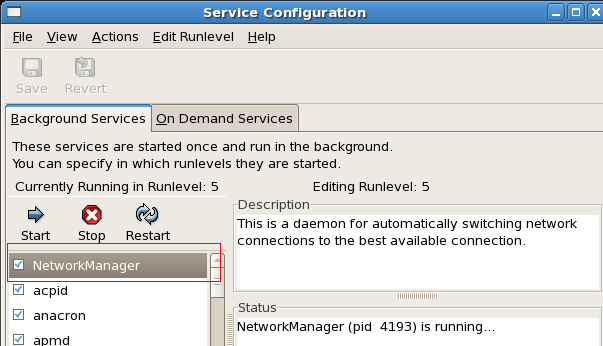
0. Stop the Network Manager 

If you have install Network Manager package.
Please stop it first.

# chkconfig NetworkManager off
# /etc/init.d/NetworkManager stop

1. Create bonding.conf


# vim /etc/modprobe.d/bonding.conf
alias bond0 bonding

2. Create 3 file under /etc/sysconfig/network-scripts/

===File: ifcfg-eth0===
DEVICE=eth0
BOOTPROTO=none
ONBOOT=yes
MASTER=bond0
SLAVE=yes
USERCTL=no

===File: ifcfg-eth1===
DEVICE=eth1
BOOTPROTO=none
ONBOOT=yes
MASTER=bond0
SLAVE=yes
USERCTL=no

===File: ifcfg-bond0===
DEVICE=bond0
IPADDR=192.168.0.126
NETMASK=255.255.255.0
ONBOOT=yes
BOOTPROTO=none
USERCTL=no
BONDING_OPTS="miimon=1000 mode=active-backup"

3. Make sure you specify all required parameters

It is essential that both arp_interval and arp_ip_target parameters are specified, or, alternatively, the miimon parameter is specified. Failure to do so can cause degradation of network performance in the event that a link fails.

* arp_interval
 If using this setting while in mode 0 or 2 (the two load-balancing modes), the network switch must be configured to distribute packets evenly across the NICs. For more information on how to accomplish this, refer to  /usr/share/doc/kernel-doc-/Documentation/networking/ bonding.txt

* arp_ip_target
 Specifies the target IP address of ARP requests when the arp_interval parameter is enabled. Up to 16 IP addresses can be specified in a comma separated list

4. Mode Value

mode= 
Allows you to specify the bonding policy. The can be one of:

*balance-rr or 0
 Sets a round-robin policy for fault tolerance and load balancing. Transmissions are received and sent out sequentially on each bonded slave interface beginning with the first one available.

*active-backup or 1
 Sets an active-backup policy for fault tolerance. Transmissions are received and sent out via the first available bonded slave interface. Another bonded slave interface is only used if the active bonded slave interface fails.

*balance-xor or 2
Sets an XOR (exclusive-or) policy for fault tolerance and load balancing. Using this method, the interface matches up the incoming request's MAC address with the MAC address for one of the slave NICs. Once this link is established, transmissions are sent out sequentially beginning with the first available interface.

*broadcast or 3
Sets a broadcast policy for fault tolerance. All transmissions are sent on all slave interfaces.

*802.3ad or 4
Sets an IEEE 802.3ad dynamic link aggregation policy. Creates aggregation groups that share the same speed and duplex settings. Transmits and receives on all slaves in the active aggregator. Requires a switch that is 802.3ad compliant.

*balance-tlb or 5
Sets a Transmit Load Balancing (TLB) policy for fault tolerance and load balancing. The outgoing traffic is distributed according to the current load on each slave interface. Incoming traffic is received by the current slave. If the receiving slave fails, another slave takes over the MAC address of the failed slave.

*balance-alb or 6
Sets an Active Load Balancing (ALB) policy for fault tolerance and load balancing. Includes transmit and receive load balancing for IPV4 traffic. Receive load balancing is achieved through ARP negotiation.

reference : RHEL 6 : 24.7.2. Using Channel Bonding

2012年4月24日 星期二

2011年2月23日 星期三

[samba] 使用user 登入的簡易設定


1. 修改 /etc/samba/smb.conf
      
      security = use     r#將security 改成user
      
      #加入要分享的目錄


      [global]
        security = user
        encrypt passwords = yes
        #passdb backend = tdbsam
        passdb backend = smbpasswd
        smb passwd file = /etc/samba/smbpasswd

      [share1]
        comment = share
        path    =       /share
        browseable = yes
        writable=       yes
        public  =       yes
        valid users = @users  #加上 @ 之後的名稱代表著群組之意,這裡用users 群組來當例子


2.將分享的目錄改成users


      #chgrp users /share 
     
3.將user 加入指定群組 (如:users)
      
      #useradd test1 -g users
      #passwd test1 #記得設定一下密碼


4.設定使用者密碼 , 再檢查/etc/samba/smbpasswd 是否有新增使用者

      #smbpasswd -a test1
      #cat /etc/samba/smbpasswd

user1:515:E8450C7E07112982AAD3B435B51404EE:2D7F1A5A61D3A96FB5159B5EEF17ADC6:[U          ]:LCT-4D837665:

5.連線至samba server 後.就會要求輸入密碼


6.最後.可以使用ACL權限再來做細部的設定,可以有更多的權限管理

2011年2月9日 星期三

發生【這個伺服器的時鐘與主要網域控制站的時鐘不同步】的問題

放假回來,打開NB,再開啟網路資料時出現了一個訊息

"這個伺服器的時鐘與主要網域控制站的時鐘不同步"

查了查.原來samba server 的時間與 time server 時間不同步了

在samba server 直接下command

# net time set

就解決了

2011年2月8日 星期二

CenOS 5.5 with BCM4312 無線網路

當初在試時,有自己用個AP來試,但後來這試過成功後,就沒試了 , 因為NB是公司用的,無線要連也需要額外認証,所以就沒用了

有需要的話,也可以參考看看

******CenOS 5 with BCM4312 無線網路******


1.Download driver from
http://www.broadcom.com/support/802.11/linux_sta.php

32bit -> hybrid-portsrc-x86_32-v5.60.48.36.tar.gz
64bit -> hybrid-portsrc-x86_64-v5.60.48.36.tar.gz

Download to ~/

2. 解開driver

# cd ~

# mkdir ~/hybrid-wl

# cd ~/hybrid-wl

# tar -xvzf ~/hybrid-portsrc-x86_32_5_10_27_6.tar.gz


3. 修改 typedefs.h

# cd ~/hybrid-wl/src/nclude/

# vim typedefs.h


#define TYPEDEF_BOOL --> 加到最開頭


4. Now build the Loadable Kernel Module (LKM) like so:

# make -C /lib/modules/`uname -r`/build M=`pwd`


5.如果沒有load下列module 沒有就不用做此步驟 : b43, b43legacy or b43xx

# rmmod bcm43xx ; rmmod b43 ; rmmod b43legacy


ndiswrapper modules:

# rmmod ndiswrapper


6. 修改modprobe.conf

# vi /etc/modprobe.conf
加入

modprobe ieee80211_crypt_tkip

modprobe wl
alias eth1 wl --> eth1,eth0要看你的無線網卡是那一個

7. 複製wl.ko 檔

# cp ~/hybrid-wl/wl.ko /lib/modules/`uname -r`/kernel/net/wireless/

重新開機


8. 開啟 network Manager

# system-config-service

把network manager 勾起來


9. 右上角會看到圖示,就可以開始設定你的網路組態

圖中是我已經設定好的...


[DD-WRT] VPN service - PPTP server

最近閒著,把自己AP的FW刷了DD-WRT的FW

看到裡面的services 有個VPN就來玩一下.其實設定還蠻簡單的,可以參考下列圖片:


***比較要注意的地方就是 CHAP-Secrets***

這裡是設定連線帳號和密碼的的地方,格式為 [帳號空格*空格密碼空格*]

設定方式參考下面例子:
帳號 : test
密碼 : test
設定方為 --> test空格*空格test空格*

如果有二個帳號以上,如 test1.test2 , 密碼為test ,那麼設定就為
test1空格*空格test空格*
test2空格*空格test空格*

2009年7月28日 星期二

Linux Serial Console HOWTO

Step 1: Check your system's serial support

[root@oscar root]# dmesg | grep tty
ttyS0 at 0x03f8 (irq = 4) is a 16550A
ttyS1 at 0x02f8 (irq = 3) is a 16550A

[root@oscar root]# setserial -g /dev/ttyS[01]
/dev/ttyS0, UART: 16550A, Port: 0x03f8, IRQ: 4
/dev/ttyS1, UART: 16550A, Port: 0x02f8, IRQ: 3

Step 2: Configure your inittab to support serial console logins

edit /etc/inittab additions are
# Run agetty on COM1/ttyS0 and COM2/ttyS1
s0:2345:respawn:/sbin/agetty -L -f /etc/issueserial 9600 ttyS0 vt100
s1:2345:respawn:/sbin/agetty -L -f /etc/issueserial 38400 ttyS1 vt100
#s1:2345:respawn:/sbin/agetty -L -i 38400 ttyS1 vt100

Step 3:
edit the /etc/securetty config file
add
ttyS0
ttyS1


http://www.vanemery.com/Linux/Serial/serial-console.html