就已經改到 /var/log/syslog
2012年7月12日 星期四
UEFI + Legacy PXE server
adding those two to your dhcpd.conf
# vim /etc/dhcp/dhcpd.com
option arch code 93 = unsigned integer 16
if option arch = 00:00 {
filename "pxelinux.0";
} else {
filename "BOOTX64.efi";
}
2012年5月24日 星期四
Linux : ulimit
ulimit [-SHacdfltu]
選項與參數:
-H :hard limit ,嚴格的設定,必定不能超過這個設定的數值;
-S :soft limit ,警告的設定,可以超過這個設定值,但是若超過則有警告訊息。
在設定上,通常 soft 會比 hard 小,舉例來說,soft 可設定為 80 而 hard
設定為 100,那麼你可以使用到 90 (因為沒有超過 100),但介於 80~100 之間時,
系統會有警告訊息通知你!
-a :後面不接任何選項與參數,可列出所有的限制額度;
-c :當某些程式發生錯誤時,系統可能會將該程式在記憶體中的資訊寫成檔案(除錯用),
這種檔案就被稱為核心檔案(core file)。此為限制每個核心檔案的最大容量。
-f :此 shell 可以建立的最大檔案容量(一般可能設定為 2GB)單位為 Kbytes
-d :程序可使用的最大斷裂記憶體(segment)容量;
-l :可用於鎖定 (lock) 的記憶體量
-t :可使用的最大 CPU 時間 (單位為秒)
-u :單一使用者可以使用的最大程序(process)數量。
from Linux Vbird
zone_reclaim_mode
zone_reclaim_mode:
Zone_reclaim_mode allows someone to set more or less aggressive approaches to
reclaim memory when a zone runs out of memory. If it is set to zero then no
zone reclaim occurs. Allocations will be satisfied from other zones / nodes
n the system.
This is value ORed together of
1 = Zone reclaim on
2 = Zone reclaim writes dirty pages out
4 = Zone reclaim swaps pages
zone_reclaim_mode is set during bootup to 1 if it is determined that pages from remote zones will cause a measurable performance reduction. The page allocator will then reclaim easily reusable pages (those page
cache pages that are currently not used) before allocating off node pages.
It may be beneficial to switch off zone reclaim if the system is used for a file server and all of memory should be used for caching files from disk. In that case the caching effect is more important than data locality.
Allowing zone reclaim to write out pages stops processes that are writing large amounts of data from dirtying pages on other nodes. Zone reclaim will write out dirty pages if a zone fills up and so effectively throttle the process. This may decrease the performance of a single process since it cannot use all of system memory to buffer the outgoing writes anymore but it preserve the memory on other nodes so that the performance
of other processes running on other nodes will not be affected.
Allowing regular swap effectively restricts allocations to the local node unless explicitly overridden by memory policies or cpuset configurations.
2012年5月16日 星期三
NIC Bonding on RHEL 6
0. Stop the Network Manager
Please stop it first.
# chkconfig NetworkManager off
# /etc/init.d/NetworkManager stop
1. Create bonding.conf
# vim /etc/modprobe.d/bonding.conf
alias bond0 bonding
2. Create 3 file under /etc/sysconfig/network-scripts/
===File: ifcfg-eth0===
DEVICE=eth0
BOOTPROTO=none
ONBOOT=yes
MASTER=bond0
SLAVE=yes
USERCTL=no
===File: ifcfg-eth1===
DEVICE=eth1
BOOTPROTO=none
ONBOOT=yes
MASTER=bond0
SLAVE=yes
USERCTL=no
===File: ifcfg-bond0===
DEVICE=bond0
IPADDR=192.168.0.126
NETMASK=255.255.255.0
ONBOOT=yes
BOOTPROTO=none
USERCTL=no
BONDING_OPTS="miimon=1000 mode=active-backup"
3. Make sure you specify all required parameters
It is essential that both arp_interval and arp_ip_target parameters are specified, or, alternatively, the miimon parameter is specified. Failure to do so can cause degradation of network performance in the event that a link fails.
* arp_interval
If using this setting while in mode 0 or 2 (the two load-balancing modes), the network switch must be configured to distribute packets evenly across the NICs. For more information on how to accomplish this, refer to /usr/share/doc/kernel-doc-
* arp_ip_target
Specifies the target IP address of ARP requests when the arp_interval parameter is enabled. Up to 16 IP addresses can be specified in a comma separated list
4. Mode Value
mode=
Allows you to specify the bonding policy. The
*balance-rr or 0
Sets a round-robin policy for fault tolerance and load balancing. Transmissions are received and sent out sequentially on each bonded slave interface beginning with the first one available.
*active-backup or 1
Sets an active-backup policy for fault tolerance. Transmissions are received and sent out via the first available bonded slave interface. Another bonded slave interface is only used if the active bonded slave interface fails.
*balance-xor or 2
Sets an XOR (exclusive-or) policy for fault tolerance and load balancing. Using this method, the interface matches up the incoming request's MAC address with the MAC address for one of the slave NICs. Once this link is established, transmissions are sent out sequentially beginning with the first available interface.
*broadcast or 3
Sets a broadcast policy for fault tolerance. All transmissions are sent on all slave interfaces.
*802.3ad or 4
Sets an IEEE 802.3ad dynamic link aggregation policy. Creates aggregation groups that share the same speed and duplex settings. Transmits and receives on all slaves in the active aggregator. Requires a switch that is 802.3ad compliant.
*balance-tlb or 5
Sets a Transmit Load Balancing (TLB) policy for fault tolerance and load balancing. The outgoing traffic is distributed according to the current load on each slave interface. Incoming traffic is received by the current slave. If the receiving slave fails, another slave takes over the MAC address of the failed slave.
*balance-alb or 6
Sets an Active Load Balancing (ALB) policy for fault tolerance and load balancing. Includes transmit and receive load balancing for IPV4 traffic. Receive load balancing is achieved through ARP negotiation.
reference : RHEL 6 : 24.7.2. Using Channel Bonding
2011年2月23日 星期三
[samba] 使用user 登入的簡易設定
1. 修改 /etc/samba/smb.conf
security = use r#將security 改成user
#加入要分享的目錄
[global]
security = user
encrypt passwords = yes
#passdb backend = tdbsam
passdb backend = smbpasswd
smb passwd file = /etc/samba/smbpasswd
comment = share
path = /share
browseable = yes
writable= yes
public = yes
valid users = @users #加上 @ 之後的名稱代表著群組之意,這裡用users 群組來當例子
2.將分享的目錄改成users
#chgrp users /share
3.將user 加入指定群組 (如:users)
#useradd test1 -g users
#passwd test1 #記得設定一下密碼
4.設定使用者密碼 , 再檢查/etc/samba/smbpasswd 是否有新增使用者
#smbpasswd -a test1
#cat /etc/samba/smbpasswd
user1:515:E8450C7E07112982AAD3B435B51404EE:2D7F1A5A61D3A96FB5159B5EEF17ADC6:[U ]:LCT-4D837665:
6.最後.可以使用ACL權限再來做細部的設定,可以有更多的權限管理
2011年2月9日 星期三
發生【這個伺服器的時鐘與主要網域控制站的時鐘不同步】的問題
放假回來,打開NB,再開啟網路資料時出現了一個訊息
"這個伺服器的時鐘與主要網域控制站的時鐘不同步"
查了查.原來samba server 的時間與 time server 時間不同步了
在samba server 直接下command
# net time set
就解決了
"這個伺服器的時鐘與主要網域控制站的時鐘不同步"
查了查.原來samba server 的時間與 time server 時間不同步了
在samba server 直接下command
# net time set
就解決了
2011年2月8日 星期二
CenOS 5.5 with BCM4312 無線網路
當初在試時,有自己用個AP來試,但後來這試過成功後,就沒試了 , 因為NB是公司用的,無線要連也需要額外認証,所以就沒用了
1.Download driver from
http://www.broadcom.com/support/802.11/linux_sta.php
32bit -> hybrid-portsrc-x86_32-v5.60.48.36.tar.gz
64bit -> hybrid-portsrc-x86_64-v5.60.48.36.tar.gz
Download to ~/
2. 解開driver
3. 修改 typedefs.h
# cd ~/hybrid-wl/src/nclude/
4. Now build the Loadable Kernel Module (LKM) like so:
5.如果沒有load下列module 沒有就不用做此步驟 : b43, b43legacy or b43xx
ndiswrapper modules:
6. 修改modprobe.conf
# vi /etc/modprobe.conf
加入
alias eth1 wl --> eth1,eth0要看你的無線網卡是那一個
7. 複製wl.ko 檔
# cp ~/hybrid-wl/wl.ko /lib/modules/`uname -r`/kernel/net/wireless/
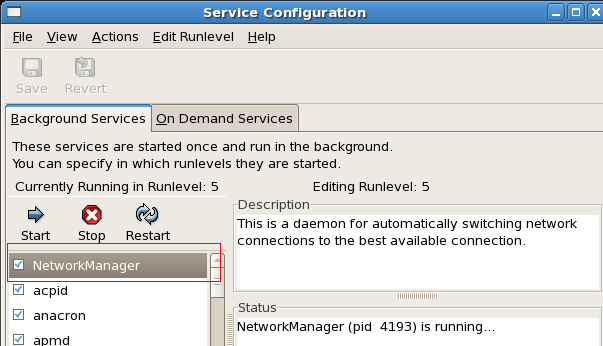
8. 開啟 network Manager
# system-config-service

9. 右上角會看到圖示,就可以開始設定你的網路組態
圖中是我已經設定好的...

有需要的話,也可以參考看看
******CenOS 5 with BCM4312 無線網路******
1.Download driver from
http://www.broadcom.com/support/802.11/linux_sta.php
32bit -> hybrid-portsrc-x86_32-v5.60.48.36.tar.gz
64bit -> hybrid-portsrc-x86_64-v5.60.48.36.tar.gz
Download to ~/
2. 解開driver
# cd ~
# mkdir ~/hybrid-wl
# cd ~/hybrid-wl
# tar -xvzf ~/hybrid-portsrc-x86_32_5_10_27_6.tar.gz
3. 修改 typedefs.h
# cd ~/hybrid-wl/src/nclude/
# vim typedefs.h
#define TYPEDEF_BOOL --> 加到最開頭
4. Now build the Loadable Kernel Module (LKM) like so:
# make -C /lib/modules/`uname -r`/build M=`pwd`
5.如果沒有load下列module 沒有就不用做此步驟 : b43, b43legacy or b43xx
# rmmod bcm43xx ; rmmod b43 ; rmmod b43legacy
ndiswrapper modules:
# rmmod ndiswrapper
6. 修改modprobe.conf
# vi /etc/modprobe.conf
加入
modprobe ieee80211_crypt_tkip
modprobe wlalias eth1 wl --> eth1,eth0要看你的無線網卡是那一個
7. 複製wl.ko 檔
# cp ~/hybrid-wl/wl.ko /lib/modules/`uname -r`/kernel/net/wireless/
重新開機
8. 開啟 network Manager
# system-config-service
把network manager 勾起來
9. 右上角會看到圖示,就可以開始設定你的網路組態
圖中是我已經設定好的...
2009年7月28日 星期二
Linux Serial Console HOWTO
Step 1: Check your system's serial support
[root@oscar root]# dmesg | grep tty
ttyS0 at 0x03f8 (irq = 4) is a 16550A
ttyS1 at 0x02f8 (irq = 3) is a 16550A
[root@oscar root]# setserial -g /dev/ttyS[01]
/dev/ttyS0, UART: 16550A, Port: 0x03f8, IRQ: 4
/dev/ttyS1, UART: 16550A, Port: 0x02f8, IRQ: 3
Step 2: Configure your inittab to support serial console logins
edit /etc/inittab additions are
# Run agetty on COM1/ttyS0 and COM2/ttyS1
s0:2345:respawn:/sbin/agetty -L -f /etc/issueserial 9600 ttyS0 vt100
s1:2345:respawn:/sbin/agetty -L -f /etc/issueserial 38400 ttyS1 vt100
#s1:2345:respawn:/sbin/agetty -L -i 38400 ttyS1 vt100
Step 3:
edit the /etc/securetty config file
add
ttyS0
ttyS1
http://www.vanemery.com/Linux/Serial/serial-console.html
[root@oscar root]# dmesg | grep tty
ttyS0 at 0x03f8 (irq = 4) is a 16550A
ttyS1 at 0x02f8 (irq = 3) is a 16550A
[root@oscar root]# setserial -g /dev/ttyS[01]
/dev/ttyS0, UART: 16550A, Port: 0x03f8, IRQ: 4
/dev/ttyS1, UART: 16550A, Port: 0x02f8, IRQ: 3
Step 2: Configure your inittab to support serial console logins
edit /etc/inittab additions are
# Run agetty on COM1/ttyS0 and COM2/ttyS1
s0:2345:respawn:/sbin/agetty -L -f /etc/issueserial 9600 ttyS0 vt100
s1:2345:respawn:/sbin/agetty -L -f /etc/issueserial 38400 ttyS1 vt100
#s1:2345:respawn:/sbin/agetty -L -i 38400 ttyS1 vt100
Step 3:
edit the /etc/securetty config file
add
ttyS0
ttyS1
http://www.vanemery.com/Linux/Serial/serial-console.html
2008年5月27日 星期二
2008年5月26日 星期一
[轉貼]如何使用公鑰/私鑰登入Linux 系統
How to use Authorized Key by ssh for login?
如何使用公鑰/私鑰登入 Linux 系統?
====[Root篇---開始]===============================================
以下的 config 檔,為 FC4 的 /etc/ssh/sshd_config 的內容
內容為 FC4 的 /etc/ssh/sshd_config 的內容,但僅供參考,我不敢保證完全對,
所以照抄不一定 OK,所以請依您系統的實際狀況及週遭的情況去調整。
===============================================
0.事前準備:
Puttygen.exe → Puttygen.exe
Putty.exe → Putty.exe
Pietty.exe(建議使用,有支援中文輸入,SCP 檔案上傳.)→ Pietty.exe
WinSCP3 → WinSCP3
==============================================
1.修改 /etc/ssh/sshd_config
#在 sshd_config 裡,找到與下列相符的選項,就將選項前的 # 號拿掉:
Protocol 2
RSAAuthentication yes
PubkeyAuthentication yes
AuthorizedKeysFile .ssh/authorized_keys
PermitRootLogin yes
#找到 ChallengeResponseAuthentication yes 的選項,改成 no ,如下:
#(選項解釋:密碼登入選項,一定要改成 no,這樣子沒有擁有私鑰的人就會無法登入了)
# Change to no to disable s/key passwords
#修改成 no 來停用 s/key 密碼
#ChallengeResponseAuthentication yes
ChallengeResponseAuthentication no
還有把 PasswordAuthentication yes
改成 PasswordAuthentication no
#以下為非必要選項
SyslogFacility AUTHPRIV(或 SyslogFacility AUTH)
LogLevel INFO
接下來就存檔離開
重新啟動 sshd 服務.
#service sshd restart
2.在 Server 端,使用 ssh-keygen 來建立 DSA Private Key 和 Public Key.
先檢查 /root 下有沒有 .ssh 的資料夾,如果有就略過建立資料夾的步驟,
在 /root 下建立資料夾 .ssh,
#mkdir .ssh
#cd .ssh
#ssh-keygen -b 2048 -t rsa
(#ssh-keygen -b 1024 -t dsa)
然後,輸入 Private Key(私鑰)檔名:id_rsa (id_dsa),和 Public Key(公鑰)檔名:id_rsa.pub (id_dsa.pub)
這個時候會問你 key passphrase,
(可以自由選擇輸入與否,即使現在不輸入也沒關係,
後面再用 puttygen.exe 轉換格式時再輸入,也是可以的,
但是不可為了省卻輸入密碼,而只用 KEY 就登入 LINUX 系統,
此舉很危險,萬一 Key 檔案被有心人士偷取,就糟糕了.>"<)
再來把公鑰的內容導入到 authorized_keys
#cat id_rsa.pub > authorized_keys
(#cat id_dsa.pub > authorized_keys)
3.因為 Openssh 的私鑰格式和 putty 使用的格式截然不同,
所以需要由 puttygen.exe 轉換格式後才能使用,不然可能會有兩種錯誤的情況:
--------------------------------------------------------------
可能出現的幾種問題:
(a)、Server refused our key
公鑰和私鑰不匹配,或者沒有 authorized_keys 文件
(b)、Unable to use key file "id_dsa.ppk"("id_rsa.ppk") (SSH2 private key)
私鑰檔案的格式不正確
--------------------------------------------------------------
3.1把 server 上的私鑰:id_dsa 拷貝到 PC 上
將 id_rsa (id_dsa)的內容顯示在螢幕上,再複製下來.
#cat id_rsa
(#cat id_dsa)
把複製的內容貼到記事本裡存成 id_rsa_by_ssh-keygen.ppk(id_dsa_by_ssh-keygen.ppk)
再來就是開啟用 puttygen.exe → Conversions → Import Key
匯入後,在 Key passphrase 和 Confirm passphrase 輸入保護私鑰的密碼後,
(不想打密碼的人,就保留成空白也可以,不過萬一私鑰掉了被撿到,那就慘了>"<),
然後,再從 File → Save Private Key 把私鑰另存新檔即可使用了。
4.Pietty/Putty 使用方法:
啟動 Pietty/Putty ,從 SSH → Auth 去指定私鑰的檔案路徑即可。
5.強烈建議:私鑰(Private Key)一定要用 Key Passphrase 來保護,
密碼(至少 8 位數以上,每三個月更換一次公/私鑰)千萬不要跟 root 的密碼一樣.
另外,當你在 Server 上用 ssh-keygen 公/私鑰時,會詢問公/私鑰的檔名和
保護 KEY 用的 Passphrase 的密碼,在 Server 有輸入的話,在用 puttygen.exe
做轉換時也會叫你輸入,所以要小心輸入喔!
====[Root篇---結束]===============================================
有些人也想說,我也想替我的使用者也提供類似的服務,不要再用密碼登入系統,想要用 Key 來登入,但是,
因為目前密碼的服務,可能已經關閉了,怎麼辦?
====[User篇---開始]===============================================
0.修改 sshd 的組態檔
/etc/ssh/sshd_config 要修改一行的內容
找到 AuthorizedKeysFile .ssh/authorized_keys
改成 AuthorizedKeysFile %h/.ssh/authorized_keys
存檔離開,並重新啟動 sshd 服務
#service sshd restart
1.建立 splin 這個使用者帳號,並修改密碼.
#useradd splin
#passwd splin
#cd /home/splin/
#mkdir .ssh
#cd .ssh
#ssh-keygen -b 2048 -t rsa
(#ssh-keygen -b 1024 -t dsa)
以下為 ssh-keygen 執行所會發問的問題:
Generating public/private dsa key pair.
當你用 root 登入時,執行 ssh-keygen 會出現下列顯示的路徑
Enter file in which to save the key (/root/.ssh/id_dsa) or (/root/.ssh/id_rsa):
當你用 splin 登入時,執行 ssh-keygen 會出現下列顯示的路徑
Enter file in which to save the key (/home/splin/.ssh/id_dsa) or (/home/splin/.ssh/id_rsa):
所以以上不管出現何種,如果出現的是預設的路徑 (/home/splin/.ssh/id_dsa) or (/home/splin/.ssh/id_rsa)就按 Enter 跳過,
則不用輸入→ /home/splin/.ssh/id_dsa or (/home/splin/.ssh/id_rsa) (要含路徑和檔名),以上跟你用那個 ID 登入系統有關係。
Enter passphrase (empty for no passphrase):
輸入要保護私鑰的密碼,這裡跟系統的密碼不用一樣,而且密碼千萬是不要一樣。
再來接下來和 Root 篇的公鑰內容導入至 authorized_keys
#cat id_rsa.pub > authorized_keys
(#cat id_dsa.pub >> authorized_keys) → 一個帳號,可以有多組的 key。
但是要確認在 /home/[users]/.ssh/ 路徑和檔名有沒有錯誤。
[users]→表示為 user 的帳號名稱。
2把 server 上的私鑰:id_dsa (id_rsa)拷貝到 PC 上
將 id_dsa (id_rsa) 的內容顯示在螢幕上,再複製下來.
#cat id_rsa
(#cat id_dsa)
把複製的內容貼到記事本裡存成 id_dsa_by_ssh-keygen.ppk
(id_rsa_by_ssh-keygen.ppk)
(檔名命名方法沒有一定,但是為不讓自己搞不清楚,這樣子做最好)
再來就是開啟用 puttygen.exe → Conversions → Import Key
(匯入時,因為我們在用 ssh-keygen 產生公/私鑰時,就有用密碼了,所以在你使用 puttygen.exe,
做匯入的動作時,自然會要求你輸入密碼了)
匯入後,在 Key passphrase 和 Confirm passphrase 輸入保護私鑰的密碼後,
(不想打密碼的人,就保留成空白也可以,不過萬一私鑰掉了被撿到,那就慘了>"<),
然後,再從 File → Save Private Key 把私鑰另存新檔即可使用了。
3.強烈建議:私鑰(Private Key)一定要用 Key Passphrase 來保護,
密碼(至少 8 位數以上,每三個月更換一次公/私鑰)千萬不要跟 root 的密碼一樣.
4.因為我是用 root 來替 splin 這個 user 建立公/私鑰,
所以我要把檔案權限和屬性稍微修改一下。
#chown -R splin.splin /home/splin/.ssh/
#chmod -R 755 /home/splin/.ssh/
5.Pietty/Putty 使用方法:
啟動 Pietty/Putty ,從 SSH → Auth 去指定私鑰的檔案路徑即可。
====[User篇---結束]===============================================
PS.
1.以上有任何看不懂的,歡迎在此發問,或來信詢問皆可。
2.在您用 putty 測試私鑰是否可以使用之前,請先不要把原先的連線直接關閉,
請先測試用私鑰可以登入後,再把停用密碼登入的選項設定由 yes 改成 no.
***** Contact Email:
*****
***** 本文由 splin 撰寫,歡迎轉載,但請保留本行文字*****
如何使用公鑰/私鑰登入 Linux 系統?
====[Root篇---開始]===============================================
以下的 config 檔,為 FC4 的 /etc/ssh/sshd_config 的內容
內容為 FC4 的 /etc/ssh/sshd_config 的內容,但僅供參考,我不敢保證完全對,
所以照抄不一定 OK,所以請依您系統的實際狀況及週遭的情況去調整。
===============================================
0.事前準備:
Puttygen.exe → Puttygen.exe
Putty.exe → Putty.exe
Pietty.exe(建議使用,有支援中文輸入,SCP 檔案上傳.)→ Pietty.exe
WinSCP3 → WinSCP3
==============================================
1.修改 /etc/ssh/sshd_config
#在 sshd_config 裡,找到與下列相符的選項,就將選項前的 # 號拿掉:
Protocol 2
RSAAuthentication yes
PubkeyAuthentication yes
AuthorizedKeysFile .ssh/authorized_keys
PermitRootLogin yes
#找到 ChallengeResponseAuthentication yes 的選項,改成 no ,如下:
#(選項解釋:密碼登入選項,一定要改成 no,這樣子沒有擁有私鑰的人就會無法登入了)
# Change to no to disable s/key passwords
#修改成 no 來停用 s/key 密碼
#ChallengeResponseAuthentication yes
ChallengeResponseAuthentication no
還有把 PasswordAuthentication yes
改成 PasswordAuthentication no
#以下為非必要選項
SyslogFacility AUTHPRIV(或 SyslogFacility AUTH)
LogLevel INFO
接下來就存檔離開
重新啟動 sshd 服務.
#service sshd restart
2.在 Server 端,使用 ssh-keygen 來建立 DSA Private Key 和 Public Key.
先檢查 /root 下有沒有 .ssh 的資料夾,如果有就略過建立資料夾的步驟,
在 /root 下建立資料夾 .ssh,
#mkdir .ssh
#cd .ssh
#ssh-keygen -b 2048 -t rsa
(#ssh-keygen -b 1024 -t dsa)
然後,輸入 Private Key(私鑰)檔名:id_rsa (id_dsa),和 Public Key(公鑰)檔名:id_rsa.pub (id_dsa.pub)
這個時候會問你 key passphrase,
(可以自由選擇輸入與否,即使現在不輸入也沒關係,
後面再用 puttygen.exe 轉換格式時再輸入,也是可以的,
但是不可為了省卻輸入密碼,而只用 KEY 就登入 LINUX 系統,
此舉很危險,萬一 Key 檔案被有心人士偷取,就糟糕了.>"<)
再來把公鑰的內容導入到 authorized_keys
#cat id_rsa.pub > authorized_keys
(#cat id_dsa.pub > authorized_keys)
3.因為 Openssh 的私鑰格式和 putty 使用的格式截然不同,
所以需要由 puttygen.exe 轉換格式後才能使用,不然可能會有兩種錯誤的情況:
--------------------------------------------------------------
可能出現的幾種問題:
(a)、Server refused our key
公鑰和私鑰不匹配,或者沒有 authorized_keys 文件
(b)、Unable to use key file "id_dsa.ppk"("id_rsa.ppk") (SSH2 private key)
私鑰檔案的格式不正確
--------------------------------------------------------------
3.1把 server 上的私鑰:id_dsa 拷貝到 PC 上
將 id_rsa (id_dsa)的內容顯示在螢幕上,再複製下來.
#cat id_rsa
(#cat id_dsa)
把複製的內容貼到記事本裡存成 id_rsa_by_ssh-keygen.ppk(id_dsa_by_ssh-keygen.ppk)
再來就是開啟用 puttygen.exe → Conversions → Import Key
匯入後,在 Key passphrase 和 Confirm passphrase 輸入保護私鑰的密碼後,
(不想打密碼的人,就保留成空白也可以,不過萬一私鑰掉了被撿到,那就慘了>"<),
然後,再從 File → Save Private Key 把私鑰另存新檔即可使用了。
4.Pietty/Putty 使用方法:
啟動 Pietty/Putty ,從 SSH → Auth 去指定私鑰的檔案路徑即可。
5.強烈建議:私鑰(Private Key)一定要用 Key Passphrase 來保護,
密碼(至少 8 位數以上,每三個月更換一次公/私鑰)千萬不要跟 root 的密碼一樣.
另外,當你在 Server 上用 ssh-keygen 公/私鑰時,會詢問公/私鑰的檔名和
保護 KEY 用的 Passphrase 的密碼,在 Server 有輸入的話,在用 puttygen.exe
做轉換時也會叫你輸入,所以要小心輸入喔!
====[Root篇---結束]===============================================
有些人也想說,我也想替我的使用者也提供類似的服務,不要再用密碼登入系統,想要用 Key 來登入,但是,
因為目前密碼的服務,可能已經關閉了,怎麼辦?
====[User篇---開始]===============================================
0.修改 sshd 的組態檔
/etc/ssh/sshd_config 要修改一行的內容
找到 AuthorizedKeysFile .ssh/authorized_keys
改成 AuthorizedKeysFile %h/.ssh/authorized_keys
存檔離開,並重新啟動 sshd 服務
#service sshd restart
1.建立 splin 這個使用者帳號,並修改密碼.
#useradd splin
#passwd splin
#cd /home/splin/
#mkdir .ssh
#cd .ssh
#ssh-keygen -b 2048 -t rsa
(#ssh-keygen -b 1024 -t dsa)
以下為 ssh-keygen 執行所會發問的問題:
Generating public/private dsa key pair.
當你用 root 登入時,執行 ssh-keygen 會出現下列顯示的路徑
Enter file in which to save the key (/root/.ssh/id_dsa) or (/root/.ssh/id_rsa):
當你用 splin 登入時,執行 ssh-keygen 會出現下列顯示的路徑
Enter file in which to save the key (/home/splin/.ssh/id_dsa) or (/home/splin/.ssh/id_rsa):
所以以上不管出現何種,如果出現的是預設的路徑 (/home/splin/.ssh/id_dsa) or (/home/splin/.ssh/id_rsa)就按 Enter 跳過,
則不用輸入→ /home/splin/.ssh/id_dsa or (/home/splin/.ssh/id_rsa) (要含路徑和檔名),以上跟你用那個 ID 登入系統有關係。
Enter passphrase (empty for no passphrase):
輸入要保護私鑰的密碼,這裡跟系統的密碼不用一樣,而且密碼千萬是不要一樣。
再來接下來和 Root 篇的公鑰內容導入至 authorized_keys
#cat id_rsa.pub > authorized_keys
(#cat id_dsa.pub >> authorized_keys) → 一個帳號,可以有多組的 key。
但是要確認在 /home/[users]/.ssh/ 路徑和檔名有沒有錯誤。
[users]→表示為 user 的帳號名稱。
2把 server 上的私鑰:id_dsa (id_rsa)拷貝到 PC 上
將 id_dsa (id_rsa) 的內容顯示在螢幕上,再複製下來.
#cat id_rsa
(#cat id_dsa)
把複製的內容貼到記事本裡存成 id_dsa_by_ssh-keygen.ppk
(id_rsa_by_ssh-keygen.ppk)
(檔名命名方法沒有一定,但是為不讓自己搞不清楚,這樣子做最好)
再來就是開啟用 puttygen.exe → Conversions → Import Key
(匯入時,因為我們在用 ssh-keygen 產生公/私鑰時,就有用密碼了,所以在你使用 puttygen.exe,
做匯入的動作時,自然會要求你輸入密碼了)
匯入後,在 Key passphrase 和 Confirm passphrase 輸入保護私鑰的密碼後,
(不想打密碼的人,就保留成空白也可以,不過萬一私鑰掉了被撿到,那就慘了>"<),
然後,再從 File → Save Private Key 把私鑰另存新檔即可使用了。
3.強烈建議:私鑰(Private Key)一定要用 Key Passphrase 來保護,
密碼(至少 8 位數以上,每三個月更換一次公/私鑰)千萬不要跟 root 的密碼一樣.
4.因為我是用 root 來替 splin 這個 user 建立公/私鑰,
所以我要把檔案權限和屬性稍微修改一下。
#chown -R splin.splin /home/splin/.ssh/
#chmod -R 755 /home/splin/.ssh/
5.Pietty/Putty 使用方法:
啟動 Pietty/Putty ,從 SSH → Auth 去指定私鑰的檔案路徑即可。
====[User篇---結束]===============================================
PS.
1.以上有任何看不懂的,歡迎在此發問,或來信詢問皆可。
2.在您用 putty 測試私鑰是否可以使用之前,請先不要把原先的連線直接關閉,
請先測試用私鑰可以登入後,再把停用密碼登入的選項設定由 yes 改成 no.
***** Contact Email:
***** 本文由 splin 撰寫,歡迎轉載,但請保留本行文字*****

2008年5月22日 星期四
bwm-ng (Bandwidth Monitor NG)
http://www.gropp.org/?id=projects&sub=bwm-ng
是個很簡單的即時流量檢視的套件
安裝非常EASY.
使用也很簡單.
http://www.gropp.org/?id=projects&sub=bwm-ng
是個很簡單的即時流量檢視的套件
安裝非常EASY.
使用也很簡單.
Trustix Secure Linux
最近由同事mark介紹了...Trustix Secure Linux
http://www.trustix.org/
還蠻好用的一套linux ...
才剛剛開始用而已...
所以很多東東都還在摸索...
這套linux全部灌完好
2.2版的好像才1.7G
3.5版的好像才約1.9G
在安裝時會有可以選擇的件...
也除去了一些套件,如:X-windows...
當然,除去了一些東西,Trustix Secure Linux會專注於security方面的議題...
http://www.trustix.org/
還蠻好用的一套linux ...
才剛剛開始用而已...
所以很多東東都還在摸索...
這套linux全部灌完好
2.2版的好像才1.7G
3.5版的好像才約1.9G
在安裝時會有可以選擇的件...
也除去了一些套件,如:X-windows...
當然,除去了一些東西,Trustix Secure Linux會專注於security方面的議題...
2007年11月16日 星期五
xorg.conf
1.自動建立 xorg.conf
# Xorg -configure
假設探測的結果是成功的,它將會告訴您設定檔是
放在 /root/xorg.conf.new 並且可以開始測試
2.測試 xorg.conf.new 檔案
# X -config /root/xorg.conf.new
3.半自動產生 xorg.conf
# xorgconfig
4.使用 xorgcfg
# xorgcfg
(如果 X 當掉了或是設定失敗,嘗試:)
# xorgcfg -textmode
5.將xorg.conf copy回/etc/X11/中
6. init 5 完成
# Xorg -configure
假設探測的結果是成功的,它將會告訴您設定檔是
放在 /root/xorg.conf.new 並且可以開始測試
2.測試 xorg.conf.new 檔案
# X -config /root/xorg.conf.new
3.半自動產生 xorg.conf
# xorgconfig
4.使用 xorgcfg
# xorgcfg
(如果 X 當掉了或是設定失敗,嘗試:)
# xorgcfg -textmode
5.將xorg.conf copy回/etc/X11/中
6. init 5 完成
2007年9月23日 星期日
/proc
/proc/cpuinfo - CPU 的信息 (時脈、類型與運算功能等)
/proc/meminfo - 記憶體資訊
/proc/mounts - 已加載的文件系統的列表
/proc/devices - 這個檔案記錄了系統各個主要裝置的主要裝置代號
/proc/filesystems - 目前系統已經載入的檔案系統
/proc/modules - 已經載入的模組列表,也可以想成是驅動程式
/proc/version - 核心版本
/proc/cmdline - 載入 kernel 時所下達的相關參數
/proc/interrupt - 系統的中斷(IRQ)分配狀態
/proc/dma - DMA通道
/proc/ioports - I/O埠使用狀況
/proc/pci - PCI匯流排的狀態
/proc/bus/* - 匯流排的裝置, USB 的裝置
參考資源
何謂Raw Device
Raw Device是裸設備,如沒有任何文件系統的磁盤
一塊沒有分區的硬盤,稱為原始設備(RAW DEVICE)或者是
一個分區,但是沒有用EXT3,OCFS等文件系統格式化,
稱為原始分區(RAW PARTITION)以上兩者都是裸設備
Raw Device 指硬碟上的一塊實體分區,即 logic volume.
通常資料使用 Raw Device 存放資料以提高性能.
它不是由 AIX 及檔案系統控制及管理.
LVCB 用於保存 logic volume 的訊息.
每一個 AIX logic volume 在開始都保留 512 bytes 作為LVCB.
一些資料庫廠商利用他們自己的方法管理 logic volume,
覆蓋了LVCB.AIX 只可以使用"dd"命令備份 Raw Device,
在用"dd"備份時,一定注意資料庫廠商是否覆 LVCB.
一塊沒有分區的硬盤,稱為原始設備(RAW DEVICE)或者是
一個分區,但是沒有用EXT3,OCFS等文件系統格式化,
稱為原始分區(RAW PARTITION)以上兩者都是裸設備
Raw Device 指硬碟上的一塊實體分區,即 logic volume.
通常資料使用 Raw Device 存放資料以提高性能.
它不是由 AIX 及檔案系統控制及管理.
LVCB 用於保存 logic volume 的訊息.
每一個 AIX logic volume 在開始都保留 512 bytes 作為LVCB.
一些資料庫廠商利用他們自己的方法管理 logic volume,
覆蓋了LVCB.AIX 只可以使用"dd"命令備份 Raw Device,
在用"dd"備份時,一定注意資料庫廠商是否覆 LVCB.
2007年9月22日 星期六
Linux ftp 指令
| 指令 | 說明 | 範例 |
| ls | 顯示 ascii 模式的檔案 | ls |
| dir | 顯示所有目錄清單 | dir |
| cd | 切換遠端伺服器目錄 | cd download |
| lcd | 切換本機目錄 | lcd c:\ |
| get | 下載單一檔案 | get abc.exe |
| mget | 下載複數檔案 | mget *.exe |
| put | 上傳單一檔案 | put abc.exe |
| mput | 上傳複數檔案 | mput *.exe |
| prompt | 開/關詢問模式 | prompt |
| pwd | 顯示目前所在目錄位置 | pwd |
| bye | 離開 FTP Server | bye |
| ? | 顯示指令清單 | ? |
| binary | 切換到二進制下載模式 | binary |
| ascii | 切換到文字下載模式 | ascii |
| open | 連線到 FTP Server | open cle.linux.org.tw |
| help | 顯示\指令說明 | help ls |
訂閱:
文章 (Atom)
